Software occlusion culling in Block Game

My GPU is the integrated Radeon Vega 8 that comes with my AMD Ryzen 7 5700G CPU. I tell you this so you know that my workstation is not a graphical computing powerhouse. It is, in fact, quite weak. To its credit my integrated GPU shows up as 48% faster on UserBenchmark than the GPU in my low end hardware target; a laptop I bought in 2012.
(Side note: I’m aware of accusations of inaccuracy surrounding UserBenchmarks, but it’s not that serious. I just think it’s funny that an iGPU I picked up recently doesn’t compare more favorably to a 14 year old laptop GPU that wasn’t considered that great even at the time.)
That, and the fact I want my game to run well even on a potato, is why I recently decided to try my hand at writing a software rendered occlusion culling solution for the Block Game (working title) I’m developing as I’ve always been interested in the idea. Blocks and chunks are axis aligned cubes, which makes things easier, and block games tend to have a ton of hidden geometry in the form of underground caves. There are other ways to cull these, but the algorithms tend to be fairly complex and this seemed like a good way to avoid that complexity and stick with something very conceptually simple.
In this post I’ll be explaining the development process and the solution that I eventually landed on. If you like you can also read the development thread I posted on Mastodon and Bluesky.
Before I start though I’d like to say that this came out quite well, better than I expected. It runs in half a frame at 60 FPS or less (threaded, of course) and generally culls at least 50% of the chunks that survive frustum culling. Above ground, looking straight ahead at the horizon it’ll cull around between 50 and 60% of chunks, but indoors and below ground in caves it can cull upwards of 95% of chunks, resulting in framerates of 400+ even on my weak system. All around a resounding success, though it has some cases where it breaks down which I’ll touch on at the very end of this post.
Depth based occlusion culling
Other people have explained the concept of depth based occlusion culling better than I can, but I’ll go over it real quick. You take the scene’s depth buffer, then for every cullable thing you check that depth buffer to see if any of its pixels would be visible. If so, it’s visible. If not, it’s culled.
There’s lots of stuff you can do with this. You can render at relatively high res and conservatively downsample your buffer (always using the farthest distance) which is called hierarchical Z buffers. You can, with modern technology, enlist the help of your GPU to do this. You can use motion vectors to just reuse the previous frame’s buffer. You could use async readback to get back an actual depth buffer rendered on the GPU for analysis on the CPU without stalling your GPU.
I’ll explain my final system first and then walk you through the process of how I actually arrived at that system.
Block Game’s occlusion culling
What I did is much simpler and doesn’t have any of the fancy stuff I mentioned above. I’m using FNA to create Block Game, so I’m stuck with older technology and can’t leverage the GPU’s capabilities. I could do a readback from the GPU to get the actual depth buffer, but not asynchronously, so that would necessarily involve some kind GPU stall which isn’t great. That’s why I’m just rendering on the CPU.
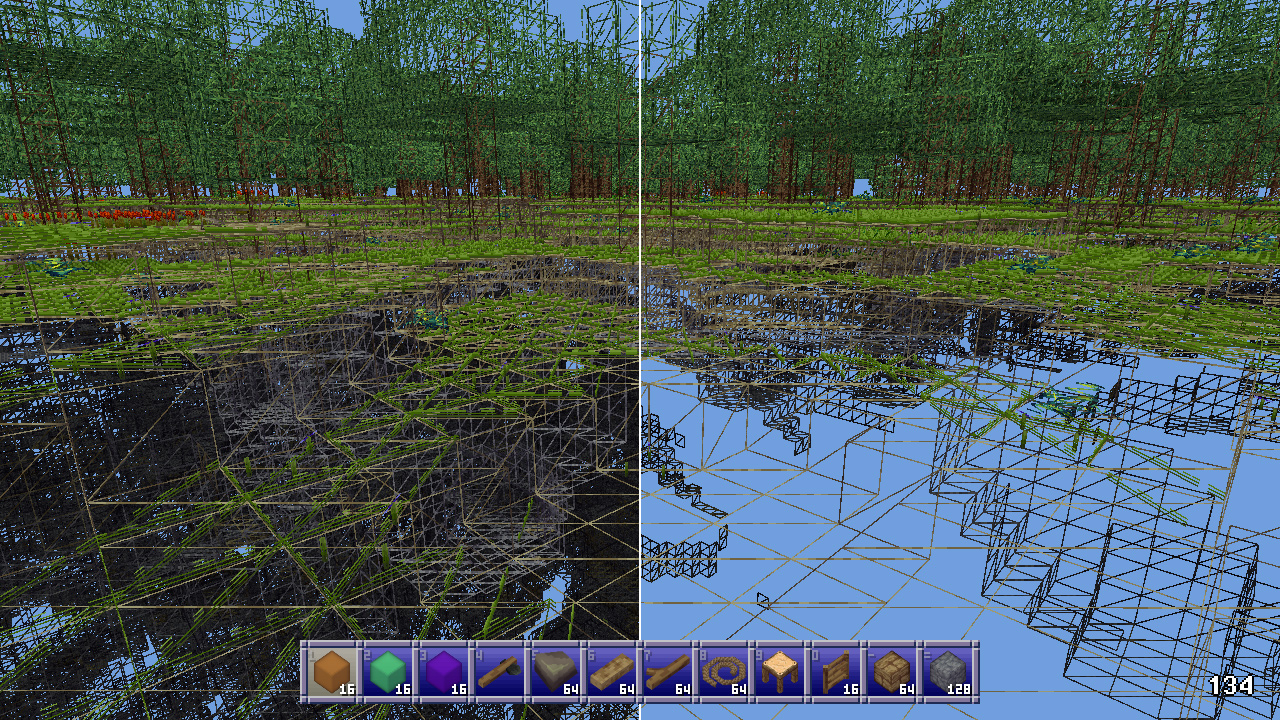
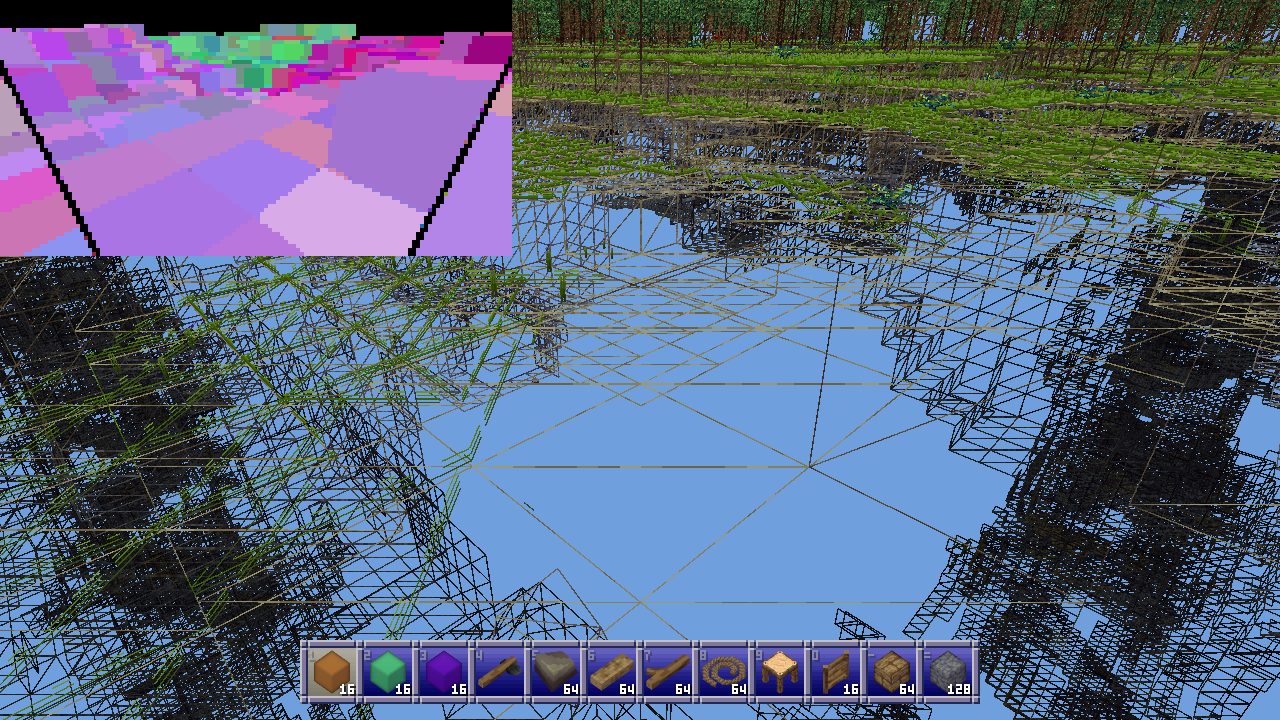
I render at a resolution of 256x128 pixels, and because in a block game everything is cubes, I render cubes into my depth buffer (which is a simple array of floats) and then check more cubes against the buffer.
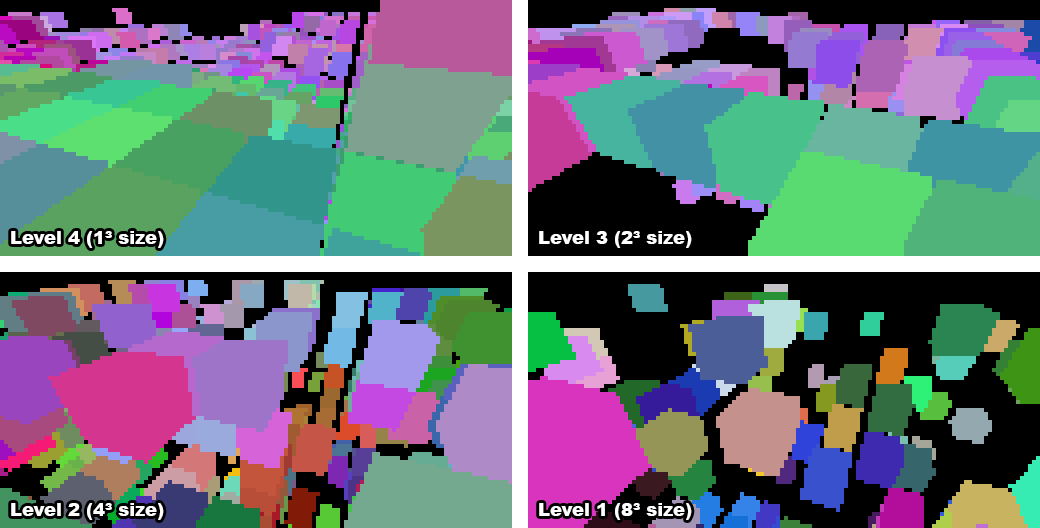
When a chunk gets rebuilt due to changes I build up a sort of “mipmap” chain of occluding subchunks. My chunks are 16x16x16 in size, so there’s 5 levels:
- this is just the entire chunk
- 2x2x2 cubes, each 8x8x8 blocks in size
- 4x4x4 cubes, each 4x4x4 blocks in size
- 8x8x8 cubes, each 2x2x2 blocks in size
- 16x16x16 cubes, each one conforming to a single block
I process level 4 first, marking as an occluder any full opaque block with a visible face. Then I go down the levels, marking as occluding subchunks any cube of blocks that has a visible face and is made up entirely of full opaque blocks.
Once the camera’s position for the frame is updated the game tells the renderer to begin occlusion culling. This gathers the chunks around the player, throws out any that don’t contain visible faces or entities, and frustum culls the rest in world space. It then sends the remaining chunks to the occlusion culler which gathers all the occluders. The highest level, occluders which are individual blocks, consists of occluders within a radius of 20 blocks of the camera. Then the next levels, 1 through 3, are gathered based on the distance of the chunks they’re in from the chunk the camera is in.
While there are plenty of level 1 occluders of 8x8x8 blocks in size, there never seem to be any 16x16x16 occluders, but I could theoretically add those too. In order to avoid false positive occlusions I shrink every occluder’s cube by 1 pixel horizontally and vertically which causes them to vanish at a far enough distance, and there’s no point rendering cubes further out than where they’re reasonably visible. Skipping occluders like this vastly reduces the workload for the occlusion culler.
The occlusion culler also stores every candidate chunk’s position, size, and chunk index in a list of chunks. Once all of this data is gathered the occlusion culler won’t need to touch the actual chunks’ data anymore, which means we’ve achieved thread safety, and signals the background thread to wake up and do the actual work.
In the background thread every occluder is first frustum culled because the earlier frustum culling only applied to entire chunks, not subchunks, and up to 8 vertex transforms are much more expensive than the dot products required for frustum culling.
The corners of the remaining occluders are then transformed into the depth buffer’s x/y coordinates and depth. To avoid the overhead of a full 4x4 projection matrix multiplication what I do is rotate using the view matrix, translate through addition, and use the linear view depth since my buffer is just made up of regular 32-bit floats. This takes fewer operations and so is significantly faster when dealing with many thousands of vertices. The occluder’s depth value is then the maximum of all linear depth values calculated.
If any of the transformed corners are invalid because they lie behind the camera’s near plane, the occluder is skipped entirely, but if not, its “shape” is traced. Instead of rendering triangles or faces, I use a 1D array that holds the minimum and maximum x coordinates for every row in the depth buffer. Tracing the shape then means finding the minimum and maximum y coordinates of any of the 8 cube corners, and then stepping through all 12 cube edges, recording the minimum and maximum x values for each row.
Drawing the occluder then becomes as easy as stepping through each row from the minimum y (plus one) to the maximum (minus one), looking up the minimum and maximum x from the 1D array (also plus and minus 1), and horizontally filling the depth buffer with the furthest possible depth value for the occluder.
The plus and minus one is because I’m rendering the depth at such a low resolution. By shrinking the cube by a pixel I can avoid edge cases where at this lower resolution a chunk wouldn’t be visible at all, while it would be at the full resolution.
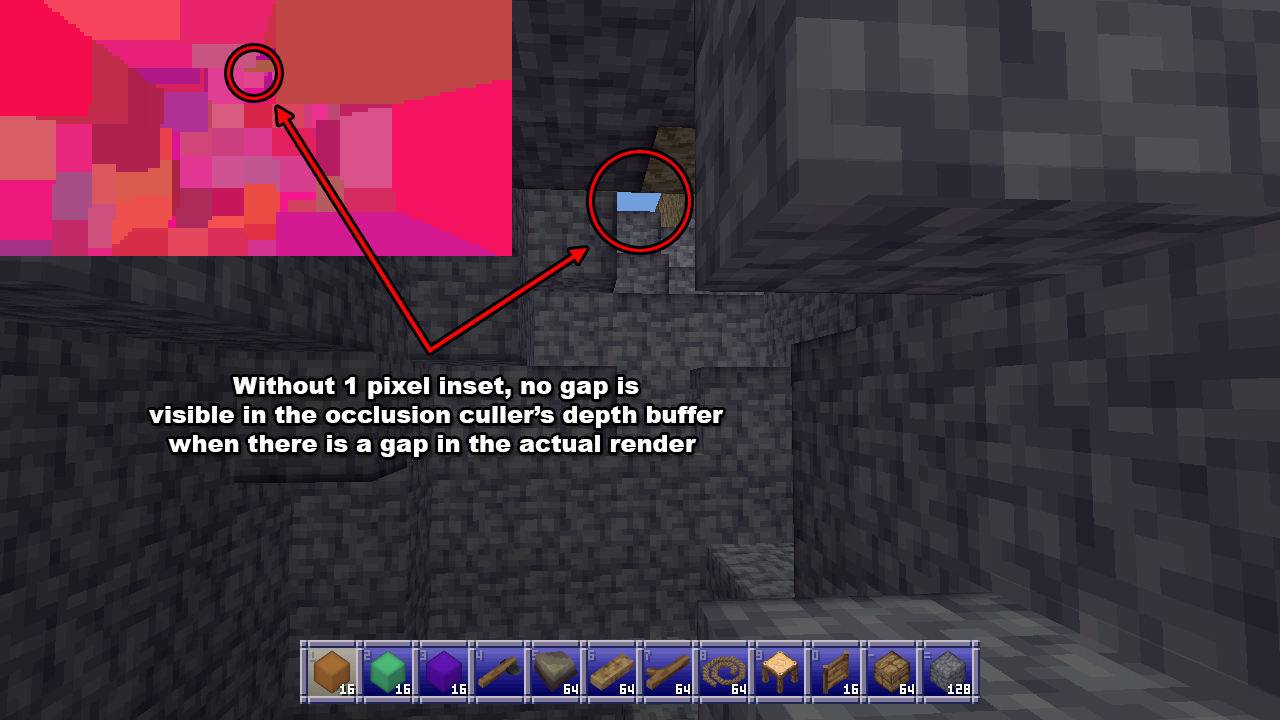
The occlusion culler then does a similar thing for all the candidates for occlusion, except it now records the nearest distance instead of the furthest, and there’s no longer a 1 pixel inset. If the depth is less than or equal to any of the values in the buffer, the chunk is visible and no more pixels need to be checked. If the depth doesn’t pass anywhere, the chunk can be culled. One notable change here is that if any of the corner vertices of a candidate chunk aren’t valid (due to being positioned behind the camera’s near plane) then it’s simply considered visible because we can’t perform the check.
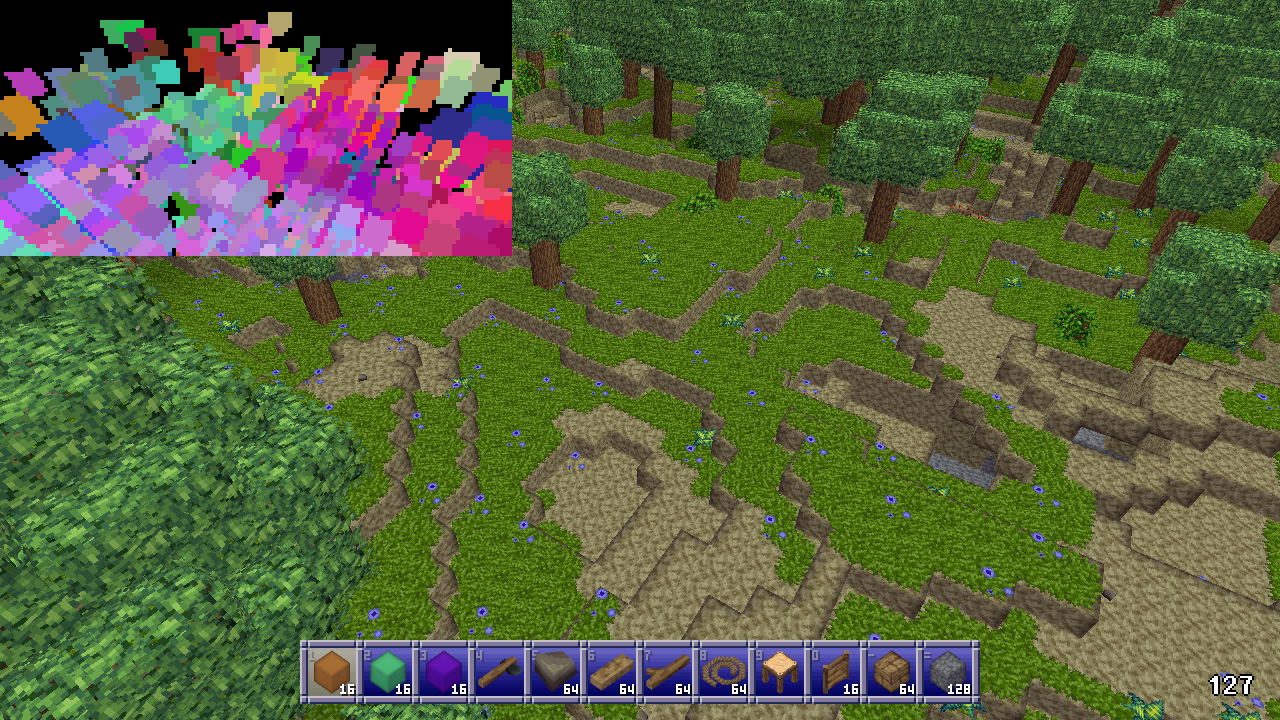
This approach works well in a variety of situations, and performs well even on slower CPUs. It really helps older systems or those with weaker graphics like my own to achieve good framerates in most normal play scenarios, without the complexity or overhead of cave visibility algorithms.
The process
Of course I didn’t come to this approach fully formed and optimized, I had to start from somewhere. My first approach was to divide each chunk into a fixed number of subchunks. I tried 2 and 4 on each edge (for 8 and 16 subchunks per chunk respectively, and recorded simply whether a subchunk was full of opaque blocks regardless of whether it had any visible faces.
I would then send all subchunks of chunks that contain non-air/void blocks and or visible entities to the occlusion culler and transform their vertices using a full 4x4 projection matrix, multiplying by 1/w and recording the x/y/z coordinates. I would save the transformed coordinates in a list, rendering the occluders in one pass then reading occlusion candidates in another. If any chunk subchunk for a candidate was visible, the whole chunk was marked visible.
I was also not properly frustum culling before this stage, only eliminating chunks I knew were fully behind the camera, so the occlusion culler at this stage was also doing frustum culling.
This did work, for some definitions of the word “work”, in that it culled occluded chunks. Unfortunately it was also very slow, taking 150-200 milliseconds to process at a render distance of 12 chunks. I’ll admit that this made me a little bit nervous: that seemed like a big gap to bridge with optimizations. But I figured I’d give it a go.
Optimization 1: cheaper transforms
First I came up with the idea to do the 3x3 view rotation plus additive translation and using linear depth. Doing it the normal way involves a 4x4 projection matrix multiplication, for 16 multiplies, and then a division by 1/w for the x, y, and z coordinates, followed by a multiplication by the buffer size for x and y for a total of 21 multiplications and 1 division.
Instead I decided to do this:
private static Vector3F Transform(Vector3F position, Matrix4 view, Vector2F focalLenPixels, out bool valid) {
    // world to view
    Vector3F viewPos;
    viewPos.X = view.M11 * position.X + view.M21 * position.Y + view.M31 * position.Z + view.M41;
    viewPos.Y = view.M12 * position.X + view.M22 * position.Y + view.M32 * position.Z + view.M42;
    viewPos.Z = -view.M13 * position.X + view.M23 * position.Y + view.M33 * position.Z + view.M43);

    // perspective divide
    var invZ = 1.0f / viewPos.Z;
    var xScreen = viewPos.X * invZ * focalLenPixels.X + (bufferWidth / 2);
    var yScreen = viewPos.Y * invZ * focalLenPixels.Y + (bufferHeight / 2);

    // distance in view space substitute for actual depth
    var dist = viewPos.Z;

    valid = dist > FNARenderer.ZNearPerspective;
    return new Vector3F(xScreen, yScreen, dist);
}
I do a 3x3 matrix multiplication and use addition for the translation. Then I do the perspective divide and multiply by the focal length in pixels. I don’t care about scaling the depth along the z axis and instead just use the depth in linear view space because that’ll still work fine for my purposes. I’m not trying to render textures or anything, so this works fine for my purposes.
The result is 13 multiplications and 1 division versus 21 multiplications and 1 division. Performing only 62% as many multiplications all on its own lowered the required time to process everything to a factor of 0.67 from 150ms to 99. Not bad!
Optimization 2: world-space frustum culling
Because I was already transforming everything into screen space I was also trying to frustum cull in that space. I quickly found out that’s a terrible idea. While you can easily calculate the bounding sphere of a cube (it’s sqrt(3) * size * 0.5) cube corners can actually stick out much further because things are non-linear after projection to screen space. That meant I had to be much more conservative with my culling, which slowed everything down.
Fortunately it was pointed out to me that a simple dot product between the frustum planes and the bounding spheres of the cubes in world space would be much cheaper and more accurate. I found a way to extract the frustum planes from my projection matrix and tried it out and found the original unoptimized run time had now been lowered to a factor of 0.43, to 61ms.
For reference, here’s my function for extracting the planes, using FNA’s Plane struct:
public static void GetFrustumPlanes(Plane[] planes, Matrix4 viewProjection) {
    Debug.Assert(planes.Length >= 6);

    // left
    planes[0] = new Plane(
        viewProjection.M14 + viewProjection.M11,
        viewProjection.M24 + viewProjection.M21,
        viewProjection.M34 + viewProjection.M31,
        viewProjection.M44 + viewProjection.M41
    );

    // right
    planes[1] = new Plane(
        viewProjection.M14 - viewProjection.M11,
        viewProjection.M24 - viewProjection.M21,
        viewProjection.M34 - viewProjection.M31,
        viewProjection.M44 - viewProjection.M41
    );

    // bottom
    planes[2] = new Plane(
        viewProjection.M14 + viewProjection.M12,
        viewProjection.M24 + viewProjection.M22,
        viewProjection.M34 + viewProjection.M32,
        viewProjection.M44 + viewProjection.M42
    );

    // top
    planes[3] = new Plane(
        viewProjection.M14 - viewProjection.M12,
        viewProjection.M24 - viewProjection.M22,
        viewProjection.M34 - viewProjection.M32,
        viewProjection.M44 - viewProjection.M42
    );

    // near
    planes[4] = new Plane(
        viewProjection.M13,
        viewProjection.M23,
        viewProjection.M33,
        viewProjection.M43
    );

    // far
    planes[5] = new Plane(
        viewProjection.M14 - viewProjection.M13,
        viewProjection.M24 - viewProjection.M23,
        viewProjection.M34 - viewProjection.M33,
        viewProjection.M44 - viewProjection.M43
    );

    // normalize planes
    for (int i = 0; i < 6; i++) {
        Plane.Normalize(ref planes[i], out planes[i]);
    }
}
This was fast enough that I eventually moved it out of the background thread and the occlusion culler entirely, into the renderer’s normal chunk gathering pass.
Optimization 3: visible faces
I then realized that my criteria for what constitutes visible geometry was wrong. I considered any chunk (or subchunk at this time) to be potentially visible if it had blocks that weren’t by definition invisible, like air. Of course, that’s naive. A chunk only has visible geometry if it has visible faces. So I cut out subchunks without visible faces as occlusion candidates.
This helped significantly, bringing the run time down to a factor of 0.21 times the original, to 34ms. I was feeling a lot more optimistic at this stage, because that’s within a couple of frames and I hadn’t even been forced to break out the SIMD!
Optimization 4: near occluders, far culling
At this stage I had a key realization that would make everything fall into place with the optimization after this one: because of perspective nearby subchunks are large, and far away subchunks are tiny.
This meant that I wanted to mostly draw nearby occluders, because a nearby occluder that covers a large amount of the buffer is far more likely to occlude things than a far away occluder that only covers a few pixels.
It also meant that I wanted to mostly test far away subchunks for occlusion, because a far away subchunk is going to be tiny, so is far more likely to be occluded and will have far fewer pixels to test.
I tested this assumption and the run time went down from a factor of 0.21 to 0.14, from 37ms to 29ms. While this wasn’t the magic bullet I wanted, it would help lead me to it.
Optimization 5: subchunk levels
Realizing that nearby things are big and far away things are small (a truly revolutionary insight, I know, please applaud) I realized that I should be doing something like mipmapping: instead of having one size of subchunks, I should use smaller subchunks up close and larger ones further away.
This would help enormously with load. As render distance goes up the number of (sub)chunks rises geometrically, but using larger subchunks further away would lower the number of subchunks geometrically, so these two forces would counteract each other.
I also realized that while I wanted occluders to be subchunks, there wasn’t much call for occlusion candidates to be split up like that. After all, if I only cared if the entire chunk was occluded, why would I want to split that test up into 8 or 16 separate tests, each with their own 8 vertex transformations? So I split up occluders and candidates, with occlusion candidates remaining entire chunks, and occluders using the multiple levels of subchunks I explained at the start of the post.
For the highest level (where every subchunk is a block) I record two bits of information about each subchunk or block: whether it’s opaque or not, and if it is opaque whether or not it’s an occluder (i.e. it has a visible face). Tracking whether a subchunk is opaque, regardless of whether or not it’s an occluder, helps when generating the lower subchunk levels.
To optimize RAM usage I actually store this information in two 16 bit integers per z-slice: one for the opacity, one for the occlusion.
When generating higher levels (i.e. bigger subchunks) I do something very similar, looking at the previous level and recording the subchunk as an occluder only if all previous subchunks in the 2x2x2 area are fully opaque, and if at least one of them is an occluder. In other words, a subchunk is an occluder if all 8 of the subchunks it represents in the next level up are opaque and at least one of them has a visible face.
When I finally tested this optimization I was blown away. At a render distance of 12 chunks it was now taking on average 0.04 times the original run time. The previous optimization had it down to 29ms, this one had it down to only 4. That’s a speed up of over seven times.
To be fair to the other optimizations I did, they had made things five times faster as well, so it’s not like they weren’t contributing.
At this point I considered my work done, and moved on to clean up.
Limitations
While this software rendered depth occlusion culling approach works really well in many cases, there are some instances where it breaks down. The most notable one is that the best occluders are the subchunks that correspond to a single block. However, I can only process a limited number of occluders without slowing things down too much, so I can only render this highest level of subchunks so far out.
Even without that, because of the 1 pixel inset these 1³ sized occluders tend to shrink into single pixels and then nothingness relatively quickly, so even if I could process more of them there’s not really any point more than 20 or so blocks away.
So if the player is somewhere where there’s no opaque blocks within a 20 block radius, such as flying in the air or standing on a ledge high off the ground, then the most useful occluders aren’t rendered at all and while occlusion culling still helps, it rapidly drops below 50% to more like 25% or worse.
As more and more subchunk levels are phased out the higher up the player goes due to shrinking into nothingness themselves, the culling performs worse and worse. Also, because many player made structures will be 1, maybe 2 blocks thick, many large and distant player made structures will not be considered occluders at all.
These cases aren’t that common in survival mode style gameplay however, and in the worst case the performance will drop to the same performance to be had without any culling at all, so it doesn’t hurt anything either. Meanwhile in many situations FPS can be, 50%, 100%, or even many times better, especially when the player is indoors or in caves. So this method is still more than worthwhile despite this limitation.
Another issue is that the 1 pixel inset on occluders can cause gaps between subchunks but especially between chunks, as occluders are limited to a single chunk and so can never span across multiple chunks. This does mean that chunks along that gap won’t be culled, but in practice this doesn’t really hurt the occlusion culler’s performance very much at all.
Future work
Partway through implementing the multiple subchunk levels I realized that it might be better if subchunks were 1 thick slices along each axis. So for example at level 2 where subchunks are 4 blocks in size you’d have 4x4x1, 4x1x4, and 1x4x4 subchunks instead. These would be much more common than their chunkier counterparts (pardon the pun) and so would be much more effective as occluders.
They’d also conform better to the geometry of player made structures. And unlike 16x16x16 subchunks which basically never occur, I think 16x16 slices one block thick would actually be found. These bigger, more common slices might provide better ground cover when the player is high up, improving the culling of underground caves in what is currently this method’s worst case scenario.
Something that might be worth doing for very high render distances on rigs with an actually powerful GPU could be to group multiple chunks into superchunks in order to reduce the volume of checks as render distance increases.
I suppose I could also try to optimize things further by using SIMD but honestly that sounds like a pain and I’m not sure I’ll bother.
If you’ve enjoyed this post, give the Block Game site a look. It has some screenshots, an FAQ, and a development feed. Also consider following me on Mastodon @eniko@mastodon.gamedev.place, or on Bluesky at @enikofox.com.
You should also read:
Reflective materials in Block Game
Over the holidays I implemented a system for reflective materials in Block Game. Here I’ll go over roughly how it works. I originally intended for this post to be a deep dive, but then I realized that the nitty gritty on this one just isn’t that interesting. Or at least, I’m just not that interested in doing a deep dive on it so this one will stay fairly high level.
Anyway, it all started when I got introduced to matcaps over on Mastodon. Matcaps are a neat way to add texture to a model without texturing it. You obtain, via photograph, 3D render, or even freehand painting, a spherical map of a material. Then, you apply it to an object by sampling the sphere based on where the normal is pointing using the view space x and y coordinates. And that, I thought, was pretty rad.

This works because when you look at an object in view space, none of the normals will be pointing away. They’ll either be pointing sideways or nominally at the camera. So half a sphere is all you need.
And I thought to myself: hey, I’ve used the spherize filter in Photoshop to make spheres out of squares. And I also thought to myself: hey, if I flip the camera around and render the scene with a high field of view into a square texture, then I could spherize that and use it as a matcap for reflective materials!
Is this the right way to do reflective materials? Absolutely not. Does it work? Yes, sometimes very well and occasionally not so good.
Continue reading...